Friday, May 11, 2012

DIY Cupcake Towers! (Dollar Tree Finds)

I recently finished a DIY project that I am so proud of! These adorable CUPCAKE TOWERS! :D

I originally wanted to buy some but realized that cupcake towers weren't very cheap...but you know what is?
The Dollar Tree!
Yup! That's right! Each one of these towers only cost ~$5 (+ cost of paint brushes if needed, paint and some heavy duty craft glue)
I created these 2 towers for a friend's baby shower and when we are done using them, I will repaint them so I can use them for my son's first birthday party (still a while away) and any other occasion where these little cuties can be used!
 
First, what you will need to make ONE tower:
-*3 silver plates (The Dollar Tree)--they have all different shapes--Round, square, and oval plates. I used 3 round plates.
-*2 candle sticks (Also, The Dollar Tree)
-*paint. (Spray paint is the best so you don't see any brush strokes but in my case, I used 1 can of spray paint for 6 plates and ran out before I could finish the last 2 plates so I ended up painting over them! lol I ended up using acrylic paint from Michaels. One in "vanilla" for the plates and one in "light pink" for the candle sticks--2 fl. oz. each)
-*heavy duty craft glue. (I used E-6000)
-*a medium sized paint brush
-*pencil
-*ruler or tape measure
...don't forget to lay down some newspaper while you paint (outside!!!)
 
Once you have all your items, make sure they are all cleaned and get started on painting!
I started painting the plates first. (Remember, I have double the plates and candlesticks because I was making TWO towers.)

Then, get started on painting the candlesticks. You don't need to worry too much about painting the "inside" parts of the candlesticks because this part won't be seen when they are attached to the plates. 
Once, all the plates are painted (front & back) as well as the candlesticks and they are all dried, here comes the fun part!
Measuring & gluing!!
This is actually the trickiest part because you want to get everything centered as much as possible.
Here's what I did to make it a little easier.
First, take 1 plate and 1 candlestick.
Place the WIDEST (base) part of the candlestick on the BOTTOM of a plate (this is so that you get more "serving space" on the plate when using the smallest part of candlestick on the top of other plates...you will see what I mean :)
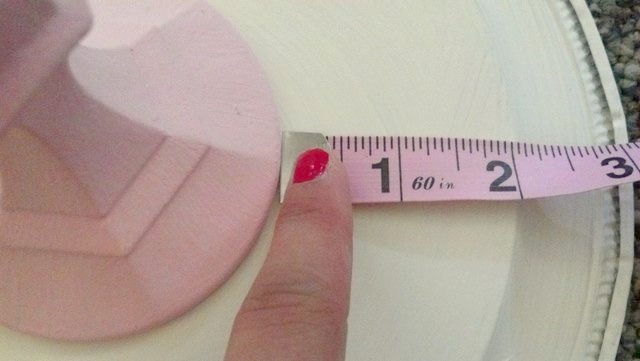
Then, I took my tape measure and measure the candlestick to the center of the plate.
For the plates I was using, it was 2" around (from the candlestick to the edge of the inside part of the plate).
Once I got the candlestick to the center with 2" measured all around, I took my pencil and traced the candlestick to the plate.
Then, take your craft glue and put it around the candlestick where you will attach it to your plate.
Proceed to place the candlestick on the plate where you traced.
Press firmly and let dry.
(If there's any oozing, take a warm damp cloth to wipe off)
 
You can do this same step with your other plate as well.
*Remember, the WIDEST part of the candlestick on the BOTTOM of the plate...so you end up with 2 plates, each with a candlestick on the bottom of each.
Your third plate will serve as the base of the tower (so leave it set aside for now).
 
Once the candlesticks are dry and stuck to the plates, stack one of the plates (the top of the plate) to the narrowest side of a candlestick.
Use the same steps to measure it to the center as we did for the widest/base part of the candlestick to the bottom of the plates. (So, you will have a plate on the bottom, then candlestick, then plate, then  candlestick)
 
I didn't take a picture of this part so I tried to edit this photo to sort of show you... Sorry it's really bad! lol
Then, it's time to place the last plate!
Place the TOP of the third plate to the narrowest part of the last candlestick, measure to center, trace, glue, press firmly, let dry, and turn it all right side up!
 
Viola! You are done!!!
Now, these cupcake towers aren't for food DIRECTLY on the plates! If you plan on putting food on them, remember to use cupcake liners, napkins, or doilies, etc.!
 
You can also use these towers for jewlery, bath necessities, etc. Look at some of these other great ideas for cupcake towers! :) 
credit
credit
credit
 
Have any questions? Ask away! Let the DIY fun begin!
 
{Have a BEAUTIFUL day!}

young and restless

Wednesday, May 9, 2012

{Vintage Treasures} Necklace! So PRETTY!

There's a new necklace joining the shop & it's VERY limited!
{Vintage Treasures}
This is a vintage inspired piece with lots of different buttons including pearls and sparkle with bits of lace.

Want one?
Head on over here to the Love Sparkle Pretty Shop
& pick one up! :)
I can also make similar necklaces with different charms which would be great for bridesmaids!
email me here: kaylanicole0317@aol.com
& we can create some great custom necklaces just for you!
***************
P.S. I will be having a GIVEAWAY once I hit 150 "likes" on my facebook page HERE
--so be sure to "like & "share" :)
My Facebook followers get the first shop updates, giveaways, & coupons! :)

Tuesday, May 8, 2012

Newest Pieces Made! Crafty, Crafty!

I have been working on a couple new projects and just wanted to share a little post on them :)I have received a few orders for some June weddings and finished a custom piece using magnolia petals, ivory chiffon, ivory french veiling, feathers, and a crystal broach.


This was originally part of a piece called HAILEY--Modeled by my beautiful friend Crystal :)
I created the flower by itself though instead of attached to a "halo" and I love it! I'm so excited to see photos of the beautiful bride that I created this piece for!
 
I am also currently working on 6 boutonnieres for another June wedding using the colors Blue/Lavender, light gray, and blush for the color palette. I can't wait to finish these because these are going to be beautiful! I love the colors that were chosen! :)
 
I also have another custom wedding hairpiece for a wedding in August. The color palette will be ivory with a bit of light pink for an accent (love the light fabric I have for this piece!) A birdcage veil will also go with this piece and a post will be on it's way about this one. :)
 
Yesterday, I received--and completed an order for a prom hairpiece--which so happens to be this friday in North Carolina! Usually, I don't take on custom orders with such a short period of time to complete but I did (& so happy I did!). It turned out so beautifully and was made to match the dress that will be worn (which is STUNNING btw).
I created this piece with ivory magnolia petals, 3 types of lace, aqua & ivory feathers, aqua blue chiffon fabric, gray/silver satin, and a bunch of different beads that I sewn to the center. These beads match the bits of beaded detail on the dress. :)
I can't wait to see photos soon of the dress and hairpiece together! :)
I ALSO made a new necklace (just about done).
I call this one
{Vintage
Tresures}
& I LOVE it!!!!
This will be available SOON in the
Love Sparkle Pretty Shop
 
Anywho, I still have a couple more orders to complete as well so I shall go and start those too :)
Let me just say though, that I LOVE what I do!
When I get to create something for somebody else who really loves it as well, it makes me so happy!
THANK YOU!!!

 
{Have a BEAUTIFUL day!}

Monday, May 7, 2012

{Mani Monday} Link Up Party!


Today is {Mani Monday}
& this is my first time painting my nails since having my son about 5 months ago!
Having a little guy makes it MUCH harder to actually paint my nails and if I could, getting them to dry is a whole other dilemma! lol
Somehow though, I was able to finally get my nails painted...
& WITH my son at home! I had to take couple a "breaks"...but call me super mom I guess. :D
The polish I used was
 Rimmel's Lasting Finish PRO in
Stiletto
Red
I love the classic red polish so it was an easy "go-to" for me.
This polish does last for a long time too and it drys FAST!
{Perfect} for a mom on the go!
I also added red rhinestones that I purchased at Joann's for $2.49 for 200 pieces.
Pretty decent--I think.
I used E-6000 to glue them onto my nail...maybe not the best because this crafting glue is not for the body but it was either that or hot glue...so I made it work! Haha
 
Here's some of my "manicure model poses" with my webcam. Not the best, but I had fun :)
I'm so proud of myself for FINALLY getting to paint my nails!!!
 
{Have a BEAUTIFUL day!}
 
Link up below & join the fun :D

Friday, May 4, 2012

{I just about fell out of my chair!!!!!!!!!!! }


When I started this blog, I never thought that I would post a review on food...or more specifically--ice-cream/gelato! You know what though? I MUST!! You know why? Because it's sooooo good! First, I must say that I'm not the biggest fan of ice-cream/gelato. I mean, I like it a lot but I usually only eat it when I'm really really in the mood for it.
Well, my husband brought home this lovely little tub of gelato called "sea salt caramel" by Talenti. He said that they just received it at the grocery store.
Once I took my first bite, I just about fell out of my chair...all the way to about my 25th bite (in which I made my husband take it away from me before I ate the whole thing!) lol
It tastes just like those little caramel squares with small chocolate chunks in it. :D
Anyway, I was also surprised to know that it is only 240 Calories (1/2 cup people)! Of course that changes if you eat the entire tub haha but I thought that was pretty darn good for something so tasty.
So, as you can tell, it's really good and I highly recommend that you go and spend a little over $4 on a pint of this gelato because it's delish! :)
If you fall in love with it and dub it your "new favorite" like my husband & I did,
{You're Welcome}
:D
Have a BEAUTIFUL rest of the day!

Wednesday, May 2, 2012

New Items + Giveaway

There are a couple new items in the
{Love Sparkle Pretty Shop}!
For starters, some new dainty rosette necklaces! :)
This one is created with mustard yellow and aqua patterned fabric hand made with 2 aqua beads on an antique brass chain.
Get this lovely little necklace right
HERE

Here's another dainty rosette necklace that was created using antique inspired lace and 2 pearls on an antique brass chain.
Get this little beauty right
HERE

Also, there's a new floral corsage pin in the shop
(which can also be a hair clip if desired.)
Go see all it's fun details here in the
{Love Sparkle Pretty Shop}

***************
There will be a
GIVEAWAY
of a headband from my shop once I hit 150 "likes" on my new
 Facebook Page.
In order for this to happen, we need less than 60 more "likes." :D
So go and show some {LOVE} right HERE
by "liking" my page and "sharing" with your friends! We are almost there!!
 
{Have a BEAUTIFUL day!}