Friday, November 30, 2012

Sneak peek of a ||Classic Love|| photoshoot!

I have been a busy girl lately between planning for a photoshoot, getting orders done, planning my son's first birthday party (it's tomorrow!), getting bday presents for all the parties we are attending, and the list can go on and on.
Today, I wanted to share some sneak peeks of the photoshoot that we had yesterday and let me tell you, there are some long stories behind that one but the FULL story will come a little later. As for now, enjoy some sneak peeks + behind the scene photos!

A beautiful quote for the shoot. I used this free template and just added some of my own changes. :)
"Once in a while in the middle of an ordinary life, love gives us a fairytale."

CAKE! Oh the things you can do with foam and frosting!
 
Some dessert signs I made. Can't wait to share the photos of the actual desserts! They came out so pretty and SO tasty!
 
Bouquet I made with lace wrapping and a skeleton key.
Keys for the "couples" table.
THE DAY OF
 Here's our model looking like a Q-tip celebrity through the salon. We had some good laughs! Loved it! :D
 
 On our way up to our Plan A location, it started sprinkling so we had to pull over and put a tarp over the antique furniture. Thank God for Kyle because between the crazy CRAZY wind and our lack of "being a man," putting the tarp over correctly without it blowing away...just wouldn't have happened! Haha
 
 Our Plan A location. It was so pretty + perfect and yet, so rainy which made us unexpectedly  choose another location because holding an umbrella over a lovely decorated antique table and getting SOAKED just wasn't cutting it. LOL That didn't last long.
Our Plan B location and final location! Sad part is, it started getting dark-FAST so we actually used the lights from our cars (you can see this in the last photo)! We were determined! :)
 
My camera lens on my phone got super foggy from the rain so this BTS photo came out pretty hazy.
 
Here are a couple photos taken by Kayla V Photography of the final shoot.
(Mind you, it was FREEZING and to have a model in an almost backless wedding dress posing without any complaints was amazing!! Our models are troopers that's for sure! Thanks again Sheena and Kyle!)
That's it for now! I will give you the WHOLE story (and some video) along with the final photos in a later post. It was an adventure kind of day so you may not want to miss this one!

Monday, November 26, 2012

Pretty Christmas Party! All DIY!

For a few weeks now, I have been planning a small Christmas party for some friends of mine that I haven't seen in a long time. I was really excited to have all of us girls together in one room again! We even set up a "Secret Santa" which was really fun because I haven't done that since like grade school! A potluck was in order as well. I chose to bring some desserts (Cranberry Bliss Bars from Starbucks, Rasberry Strudles, & German Chocolate Cookies) and an appetizer (A Tangy Lemon and White Bean Dip on French Bread with Havarti Dill Cheese on top!). We also had some homemade mac n' cheese, some homemade spinach dip, hot wings, potato salad, and a glass of Stella Pink ! Yummies! I wish I had taken a photo of the rest of the delicious food when it arrived but I forgot. :-/
 
After we ate and mingled, we played the game, "Things" which gave us some SERIOUS laughs! One of the best games EVER! :) After, a couple hours, we all opened our gifts. So many sweet gifts were given and you know what I got? I received some goodies from Starbucks which is like my favorite-favorite place! :D Thanks again Steph!
As you can probably tell, it turned out to be such a great night! So much fun!
 
As for the party planning, (this is what I LOVE to do!) I made some invites for starters and chose the color palette of gold, silver, pink, and blue hues and went with that! Afterwards, it was a matter of getting items together-old and new to create the decor. If I didn't already have something, I made it-and most things were made from items I found in a dollar bin somewhere (I'm a sucker for those)!
 
Here are some of the photos I took before the girls arrived (as you can tell because there isn't much food on the "food table" below-lol).
You might remember this stand from this post? It has been transformed! :)
Add some glitter to mini clothespins and instant "prettiness!"
Remember the movie "Elf?" Well, then you may remember the quote that's in the frame! :)
"I thought maybe we could make gingerbread houses, and eat cookie dough, and go ice skating, and maybe even hold hands."
See these cute little silver acorns pine cones with glitter on them? Dollar bin at Michaels!
This hanging ornament chandelier is made with an embroidery hoop, ribbon and various ornaments! In the clear ornaments, I added some silver and gold glitter inside to give them a bit of sparkle.
 Lovely, I must say!
I created a DIY tutorial of this little tree centerpiece right here.
For the runner, I just took some lace that I had and laid strips of it across the table.

Thanks to the girls for coming to our first Christmas get-together! It was great to see you all again and to share stories! Some great laughs were had and I can't wait to see you all again!
Love you girls! :)
Eat, Drink and Be Merry

Friday, November 23, 2012

BLACK FRIDAY-CYBER MONDAY SALE 15% off code! :)

It's BLACK FRIDAY and no, I am not out shopping today. Instead, I am sitting in Starbucks, relaxing, sipping on an iced green tea, and writing this post to tell you that....I have added a few new things to the shop including new necklaces, bow rings, and some sparkly mini bows to adorn your hair with this season! Want to know the best part? EVERYTHING is 15% off when you use the code WONDER15 at checkout!

Go visit my shop right HERE!

Why wonder15? Well, my black Friday ad is now live over at
The Wonder Forest along with several other shops! Go check it out!

Has anyone bought anything really great on Black Friday? Any killer deals? I just can't seem to want to stay up all night and fight the crowds for sale items...call me weird but I prefer to stay in my PJs and shop online. :)

Sunday, November 18, 2012

DIY ||pretty|| cake stand!

If you know me, you know that I love cake stands in all shapes and sizes! They are just so pretty! A while back, I did a tutorial on a 3 tiered cupcake stand right here and a mini cake stand right here. Today, I am sharing a tutorial on a larger cake stand that only cost $3 to make!

What you will need:
*a candle stick-99cent store
*a plate-99cent store
*an ashtray-99cent store
*some strong glue (I used E6000)

 
First, turn the ashtray upside down.

Put the glue around the smaller end of the candle stick. Then, attach it to the ashtray-making sure that it is in the center. The candlestick will essentially be upside down on the ashtray.

Lastly, place glue around the wider end of the candlestick which is facing up and attach it to the bottom of the plate-making sure it's in the center of the bottom of the plate!

Voila! That's it! Now, you can paint it or leave it the way it is. Just think, this pretty piece only cost $3 too!!
(Unless you count the cost of the glue as well).

Happy decorating!

How would you decorate your cake stand?

Saturday, November 17, 2012

2 GIVEAWAYS end in a few HOURS! + a DIY sneak peek!

There are two giveaways that I am a part of this week and both end SOON-like in a few hours-SOON!
The first, is a HUGE giveaway is over at LenaB,Actually.
Not only can you win the gold-plated chain headpiece from my shop, but you can also win several other prizes that value at about $150!!
This giveaway ends in 3 hours!!!!
So go enter right HERE

~~~~~~~~~~

The other is over at Why Girls Are Weird.
(Love her blog!)
You can win $15 shop credit toward whatever you would like from my shop!
It's the first time ever giving away shop credit so it's quite exciting. :)
It ends in 2 days so go enter right HERE.

Thank you guys SOOOOO much!
Tomorrow, I will be posting a DIY of a pretty, PRETTY, cake stand!
Total cost= $3!!
So, come back tomorrow. :)

Friday, November 16, 2012

DIY Christmas Centerpiece Tree

Next Saturday, I am hosting a Christmas party for a couple of my friends that I haven't seen in a long time so I needed to start cranking out some decor projects!
I decided to go with the colors of gold, silver, pink, and blue hues with lots of sparkle! You can't have a Christmas party without sparkle right? lol

Anyway, here's a DIY centerpiece that I made for the party and I'm going to share this tutorial with you!

What you need:
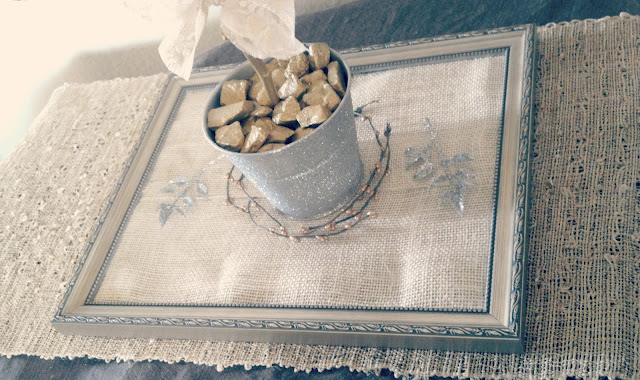
*a bucket or pot (I got this silver glitter one from the 99 cent store!)
*a stick!
*gold paint (or any other color you want)
*sparkle paint (optional)
*rocks
*decor for your branches

First, choose your weapon branch and make it a good one!
 
Make sure it's the right height and what-not when it's placed in your bucket. You may have to take some more branches off or shorten it to make it just what you want.

Once you have the "perfect branch," start painting or spray painting the branches gold.
 
After you are done painting, let the branches dry and gather up all your rocks that will go in the bucket to stand the branch up. You will only need to paint about 2 handfulls of rocks since these will be the ones on top and you won't see the others below them. I painted my rocks gold and added some gold sparkle (I love sparkle if you couldn't tell already).
 
After all of the rocks that you want painted are complete, you can start placing the unpainted rocks in the bucket around the branch to support it. Then, layer the top with the painted rocks once they are dry. You want to make sure that all of the rocks make the branch secure and hold it in place so that it doesn't tip over once you start adding decor to it.
 
Finally, decorate your little tree with whatever you would like! 
I bought these mini mosaic-like ornaments from the 99 cent store last night (9 for $1!) so I added a few of these, hung some pearl trimming, and tied a little lace bow around the branch.
To add to my centerpiece, I placed it on an old frame which I put ivory burlap in and added a bit of decor twigs around it to keep it simple.
I'm not sure if I will keep it all this way for the party but you get the idea of different decor.

There are so many other ways to decorate as well!
What about chiffon pom poms? Accordian wheels made of book pages? Beads? Crystals? Hang names for everyone to choose their secret santa? Hang "thankful notes?"
The list of ideas can go on and on!
 
How would you decorate your mini tree? :)